Digital camo "skin" transfer

Giga Bread

Mega Calories!
Aug 20, 2011
6,368
20
38
44


Disclaimer:
This method is still a work in progress. The method I chose for this tutorial may change at a later date as I continue to experiment. The finished figure is an example that used the method about to be shown.

Materials
Container of clean water
Tape (any kind but electrical will do)
Hobby knife with a really sharp blade
Soft bristled brush
Tweezers
Matte Medium
http://www.dickblick.com/products/liquitex-gloss-and-matte-mediums/?clickTracking=true
Laser print with your texture
Not shown
Slick, colorful work surface (I use a For Sale sign)
Some sort of backing surface for your print to be taped to (I'm using an old USPS mailer)
Your figure with the base color already painted.


Notes on making a pattern
You'll want to decide which color is your base color in the pattern. What I've found works best is to make the lightest color the base color. Since this decal is going to be translucent, all of the light colors in your pattern won't show up anyways, so you might as well paint that layer on the figure.

This is a nice tutorial on how to make a marpat pattern in photoshop. A lot of these techniques can be used with other patterns and just needs experimenting.
http://brixican.blogspot.com/2011/03/creating-marpat-digital-camouflage.html

When you get your pattern done, switch your base color to white before printing. I also tiled mine into sections just so I can keep track of how much I'm using per figure and also to keep the direction of the pattern correct. The desert marpat pattern is kind of stretch across. Tiling the sections into wide rectangles help me keep the pattern's orientation throughout the transfer process.


Steps for the transfer process.

1. Make a laser print of your pattern. Inkjet will not work and will just create tons of frustration.

2. Tape the outside edge of the print to a hard backed material. A piece of cardboard, masonite, whatever.


3. Just go ahead and drip the matte medium directly onto the print.


4. Using your brush, work the medium all over the page until you have a satisfactory even coat.


5. Let dry for an hour or so. In the meantime, you can finish any painting you have to do on your figure.

6. Repeat steps 3 and 4.

7. I work section by section, but while I do this, I do try to plan ahead and get camo sections to kind of line up over seams on the figure. In this step, cut out your first square and make sure you make a little bigger than the section it's going on.

8. With your camo square/rectangle turned face down on a smooth work surface, wet the back of the paper and let it soak a few seconds.

9. Using your index finger, rub the paper off carefully and continue to roll up the paper fibers and wipe them away. You'll want to work from the center out to the edges. Keep doing this until the paper starts feeling smooth.


10. Use your brush and lightly go back and forth, dusting fibers off.


11. Let it dry. When it's dried, any fibers missed with be visible and you can repeat steps 8-10 until you're comfortable with the decal. Just to note, any fibers that get trapped between the decal and the figure will show up, so the more care you take with steps 9-10, the better end result.


12. Now you're going to want to separate your decal from that smooth surface. I usually use my knife to get a corner started and carefully pull back. Keep track of the surface that was face down and what surface you removed the paper fibers from. You'll want the surface that had the paper removed to be the surface that bonds to the matte medium on the figure. This will ensure a clear image.

13. Paint a thin layer of matte medium on the part of the you're placing the square. Let it set up a little and try to avoid pooling in the sculpted details.


14. Without making contact, line up your pattern over the piece you're applying it to, making sure that the image is face up. Press the center of the pattern to the center of your piece. you don't need to press hard at all as this will just cause your image to stick to your finger or thumb.


15. Just start pressing the image down, working from the center to the edges. This will help push excess fluid out. If the surface feels a little tacky, wet your fingers to keep from pulling the pattern off. Any overhang, just leave until it dries. It will be easier to cut off then.


16. I usually keep pressing around the details but I have noticed that as it dries, it will pull the decal into the details. Any edges that start coming up can be fixed with more matte medium.

 
Last edited:
WVMojo

Mocha Viper
Jul 20, 2011
4,004
3
38
That will be pretty damn slick once you nail down the resolution...especially for us that can't paint camp for shit.
 

fogger1138

SCIENCE!
Founder
Mar 14, 2011
9,726
3
38
49
Mt Airy, MD
I'd love to be able to get a printed image onto a torso as if it was a t-shirt. I imagine you could do it in a similar fashion as this.
 

Giga Bread

Mega Calories!
Aug 20, 2011
6,368
20
38
44
I'd love to be able to get a printed image onto a torso as if it was a t-shirt. I imagine you could do it in a similar fashion as this.

tattoos, scars, logos, t-shirt prints, denim texture (not that it's needed). As long as it's going over a light colored item, it should work.
 

Giga Bread

Mega Calories!
Aug 20, 2011
6,368
20
38
44
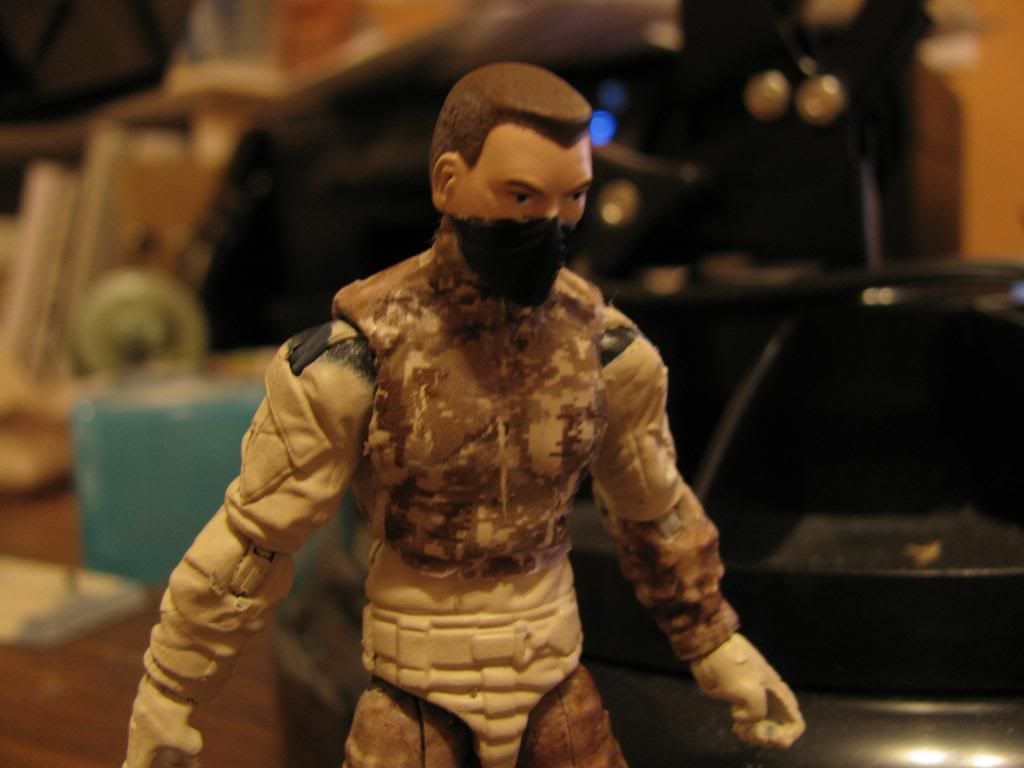
Here's the latest attempt on my guinea viper. I'm attempting a desert marpat pattern. It's still in the process of drying so I haven't had a chance to coat it or clip the fringes. This is done with one thin layer of medium and you can see there's some ripping and scratching going on as it's about as thin as a temporary tattoo. I'll be trying two thin layers tomorrow to see if I get better results.


Wild weasel

needs killer whale parts!
Jun 9, 2011
2,539
1
0
29
That looks great! If it's a waterslide decal, use solvaset once you've layed them down. It melts the decal(won't screw up paintor the plastic in any way) so it won't peel away
 

Giga Bread

Mega Calories!
Aug 20, 2011
6,368
20
38
44
2x coats of fluid medium. It's a tad thick in areas but I think it still works.


I need to touch up some areas with paint and I think I'll use some of the 1x medium coat skin scraps I have left over to fill around the shoulders and joints.
 

Giga Bread

Mega Calories!
Aug 20, 2011
6,368
20
38
44
I love how after doing a tutorial, I'm getting a lot of, "that's awesome, but I'll never do it, it looks like a lot work."

It reminds me why we both need and don't need tutorials.
 

G.I.*EDDIE

gobbles a LOT of cock
Founder
Mar 14, 2011
43,432
428
83
S.E. Mich :(
Seems like a process that will best be learned following the tutorial as you go along...doesn't seem so simple at first glance, but once you've got the hang of it, it's probably a breeze...

Thanks for taking the time to put the tutorial together for us Giga!
 

Giga Bread

Mega Calories!
Aug 20, 2011
6,368
20
38
44
Seems like a process that will best be learned following the tutorial as you go along...doesn't seem so simple at first glance, but once you've got the hang of it, it's probably a breeze...

Thanks for taking the time to put the tutorial together for us Giga!

Once you do it, you can prep several pieces at once.
 

bravo5

Enlisted
Mar 17, 2011
55
8
8
Looks fantastic! Quick question, what did you set the image resolution to? I'm getting close, but just can't get it the right size
 

Giga Bread

Mega Calories!
Aug 20, 2011
6,368
20
38
44
Looks fantastic! Quick question, what did you set the image resolution to? I'm getting close, but just can't get it the right size

I start with a 1"x1" square at 300dpi. After I use the mosaic filter, I stretch width to 1.5".

After I got the pattern and before flattening the layers. I change the canvas size to 3" wide x 2" tall. And then it's just about using copy/paste or stamping to fill in the pattern.
 

bravo5

Enlisted
Mar 17, 2011
55
8
8
I start with a 1"x1" square at 300dpi. After I use the mosaic filter, I stretch width to 1.5".

After I got the pattern and before flattening the layers. I change the canvas size to 3" wide x 2" tall. And then it's just about using copy/paste or stamping to fill in the pattern.

Thanks!
 

Mandingo Rex

★★★★★
Founder
Mar 14, 2011
14,392
7
38
42
Gone Baby, Gone
Bumping this bitch. Not sure if I'll use it for the digital camo I am considering trying, but it's a good reference for folks who haven't seen it.
 

Mandingo Rex

★★★★★
Founder
Mar 14, 2011
14,392
7
38
42
Gone Baby, Gone
So, do you think this transfer would work on something like the POC "Ultimate" Snake Eyes/DG Shipwreck knit-shirt torso? With that extra texture, I'm worried that it may not go on as smoothly as it did on the Shock Trooper torso.
 

Giga Bread

Mega Calories!
Aug 20, 2011
6,368
20
38
44
So, do you think this transfer would work on something like the POC "Ultimate" Snake Eyes/DG Shipwreck knit-shirt torso? With that extra texture, I'm worried that it may not go on as smoothly as it did on the Shock Trooper torso.

It would be more difficult but I don't see why it couldn't work. The main reason I tried this in the first place was to be able to add details over folds. The thicker you make the skin, the harder it will be. I guess just test it first on a spare.
 

Mandingo Rex

★★★★★
Founder
Mar 14, 2011
14,392
7
38
42
Gone Baby, Gone
It would be more difficult but I don't see why it couldn't work. The main reason I tried this in the first place was to be able to add details over folds. The thicker you make the skin, the harder it will be. I guess just test it first on a spare.

How do you take off any "fuckup" areas? Scrape it off, or alcohol/something else?

I made a camo file last night, not sure if it'll look right but I think it will. It's tough to tell the scale without printing it, but I sent it to the wifey to print while she's at work today. (I had my project put on hold so I'm not working this week, or else I could laser-print it myself at the office I was contracting for.)

I guess I should go and paint the base coat on the figure, or I may just wait and do it tomorrow. I gotta go buy some matte medium, anyway.