Tutorial: Creating Dio Walls from Foam

Mandingo Rex

★★★★★
Founder
Mar 14, 2011
14,392
7
38
42
Gone Baby, Gone

Yeah, apparently it's not a loading dock, but that's kind of what I want to use it for I guess. They have a bunch of lower ones, too. I got 2 stairs thinking they were close to the ones MB had shown pics of, but they're really high. I'll still probably keep them because they're cool, but they're too high for my original intentions.

To me, it looks kind of like a loading dock though, or at least that it could be used similarly. *shrug*
 

bigdaddyblue73

Drunken Recon
Mar 15, 2011
307
3
0
51
The indow above the door is too close to the top of the door. Ther is not enough room for a floor. You would only see the figure's ankles to thighs.
 

MAJOR BLOOD

Size matters
Staff member
Mar 13, 2011
13,592
8
38
If you do a Rincon look on e bay. You can find them cheap sometimes. I have them at the Target I go to if anyone needs it. Cost+shipping+gas+time.
 

Mandingo Rex

★★★★★
Founder
Mar 14, 2011
14,392
7
38
42
Gone Baby, Gone
If you do a Rincon look on e bay. You can find them cheap sometimes. I have them at the Target I go to if anyone needs it. Cost+shipping+gas+time.

Oh sure, charge for gas plus time, you scalper.

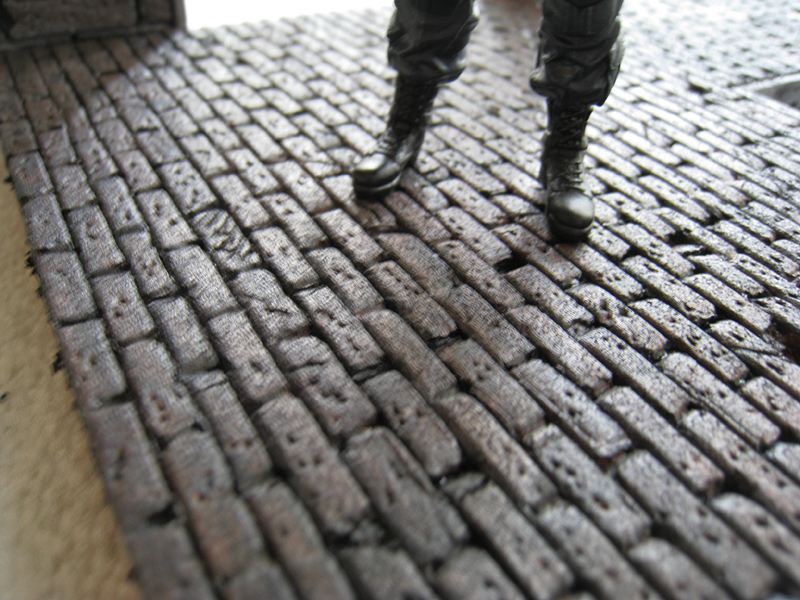
Okay, I added in better photos and a new section showing more progress. I hope to paint tomorrow and at least get one building done (without windows and doors and details, that is).

By the way, drawing and carving bricks is tedious as hell at 1:18. I can't imagine how the guy did it at 1:72 in that linked tutorial. Also, if you have a significant other, she'll probably either yell at you for getting pink "dust" (foam debris) all over the kitchen and risking killing the entire household. (Eye roll.)

Also, you may be at risk for being chastised for "making dollhouses".
 

Mandingo Rex

★★★★★
Founder
Mar 14, 2011
14,392
7
38
42
Gone Baby, Gone
The window above the door is too close to the top of the door. There is not enough room for a floor. You would only see the figure's ankles to thighs.

Yeah, I said it wasn't exactly proper in the description. I guess it's not technically a second floor anyways, and sure as hell not to building code. One building has a vent that I'm adding (not an upstairs window), and the second one could just have a crawl space or have a high ceiling. I never intended it to really be a terribly modern 2-story building, as that would need to be much taller than the 10-12" that I cut for this demo.
 

MAJOR BLOOD

Size matters
Staff member
Mar 13, 2011
13,592
8
38
Holy shit Rex! That looks awesome! You are doing a great job on the buildings. The brick work is really top notch. Can't wait to see the final product.

Figures you'd use pink.
 

Mandingo Rex

★★★★★
Founder
Mar 14, 2011
14,392
7
38
42
Gone Baby, Gone
Holy shit Rex! That looks awesome! You are doing a great job on the buildings. The brick work is really top notch. Can't wait to see the final product.

Figures you'd use pink.

I know, I wish I could have found blue. Although pink will probably look less weird if I miss a spot with paint.

THEY"RE ACTION FIGURES!@!!!11111!!!!1111!!

I actually thought my girlfriend was making a "I actually care" comment about how much I bought, because she asked in an interested manner about how much more foam I had. Then she goes, "...Because I was wanting to know if you could make me a vacation house for my Barbies. We can get them out of storage next time I visit my parents."

Also, I think you should donate a building to the Fighting 1:18th so our figures can have a clubhouse and so we can review it :D

Haha, we'll see how these first wall sections go. I could be up for making a partial building.
 

MAJOR BLOOD

Size matters
Staff member
Mar 13, 2011
13,592
8
38
Also, I think you should donate a building to the Fighting 1:18th so our figures can have a clubhouse and so we can review it :D

When you are right you are dead on. It will need a review from unbiased eyes. ;)
 

G.I.*EDDIE

gobbles a LOT of cock
Founder
Mar 14, 2011
43,432
428
83
S.E. Mich :(
oh man, they came out great!...i love the smaller bricks and the finer details you put into them...they looks really good...and they seem much larger now with the ST in the pic...

oh, yer girls sense of humor "make my barbies a house too!", awesome!
 

Mandingo Rex

★★★★★
Founder
Mar 14, 2011
14,392
7
38
42
Gone Baby, Gone
Okay, added in the painting section. In keeping this shortish (relative to how long it could be, I guess... sorry for the lengthy posts, I may go back and cut down the copy to simplify things) I left out the various detail steps in painting because there's really no "method" exactly, as I just added paint until I was happy, using various mixed techniques.


G.I.*EDDIE

gobbles a LOT of cock
Founder
Mar 14, 2011
43,432
428
83
S.E. Mich :(
oh i know you have got to pleased with those results...that is some bada$$ looking "brick"...

along the door/window frames it looks like they are recessed a bit?...is that my imagination?

same goes for the stucco part but reversed...it looks like the stucco part is raised?
 
Last edited:

MAJOR BLOOD

Size matters
Staff member
Mar 13, 2011
13,592
8
38
I can see this moving onto flooring too. Cobblestone? Sidewalks? Pothole ridden road?
 

MAJOR BLOOD

Size matters
Staff member
Mar 13, 2011
13,592
8
38
Seriously Rex, this is a great tutorial you are doing. The detail is pretty damn sweet on the building walls. I'd like to see you do a whole building one day. I'm sure this is very time consuming but the final product is effin' amazing! Is this really your first?
 

Mandingo Rex

★★★★★
Founder
Mar 14, 2011
14,392
7
38
42
Gone Baby, Gone
Thanks fellas. I've been busting ass on this all afternoon, so sorry for not seeing all the replies.

Seriously Rex, this is a great tutorial you are doing. The detail is pretty damn sweet on the building walls. I'd like to see you do a whole building one day. I'm sure this is very time consuming but the final product is effin' amazing! Is this really your first?

Sort of. Working with this type of foam, no, and building scale buildings, no. I used to work at an architecture firm part time as a draftsman before changing majors in college, and I had a bunch of architecture courses in high school where I had to build small model houses out of balsa wood. But this is my first time using foam to make walls, and the outcome is fantastic. It's a great medium for this, and very forgiving for making dio walls.

I can see this moving onto flooring too. Cobblestone? Sidewalks? Pothole ridden road?

A half-street is coming up next! I skipped doing the windows and doors to get to the street, so I could get all the foam stuff out of the way first and then get to the styrene stuff, because the street will need grills and manhole covers that I'll make at the same time as the doors and windows.

oh i know you have got to pleased with those results...that is some bada$$ looking "brick"...

along the door/window frames it looks like they are recessed a bit?...is that my imagination?

same goes for the stucco part but reversed...it looks like the stucco part is raised?

Thanks man. I actually was really happy the second I applied the first layer of paint and all the recessed pits worked out like I wanted.

The recessed parts are mostly an optical illusion, but it's sort of how I intended it to be. I tried to recess the areas around the "stucco" layering a little, but it sort of worked out better than I intended when I added the paint. Some of it just lucked out by turning a mistake into something cool. The door gaps, for example, were actually a screwup that turned into something cooler than I intended. The more I messed with the foam and tried different things, I just found various ways to create effects.

Damn, Rex thats looks great and so much detail!!!

Thanks man, it was your stuff that got me to get off my ass and try this myself, so I appreciate it. :)
 

Mandingo Rex

★★★★★
Founder
Mar 14, 2011
14,392
7
38
42
Gone Baby, Gone
Blood, the street has been added in the last tutorial post on Page 1. It's just got the black base coat, but I hope to finish painting the sidewalk and street details tomorrow night and post pics. After that, I'll move onto all the smaller framed structures like doors, windows, and grills. You can hopefully see where things will go. There will be a sewer drain in the street, with 2 manhole covers and one of those sidewalk elevator/cellar type doors that open upwards. I punched the holes all the way through so I can maybe do some shots with figures coming out of them or something like that. Or even shooting upwards could be a cool shot, although I'll need to paint the underside black for that.

I think I should have added one more reserved spot. I may see if I can get those first 2 comments moved so I can free up my post 2 entries after that so they're all in order. Otherwise, that last entry may be a bit cramped.

*Also, btw... If pictures aren't showing up, it's my damn webhosting being a bitch. I rarely have downtime, but tonight things are being screwy. Hopefully they'll quit tinkering around by morning and things will all be back up running smoothly.
 
Last edited:

G.I.*EDDIE

gobbles a LOT of cock
Founder
Mar 14, 2011
43,432
428
83
S.E. Mich :(
suck it MB!

okay, sooooo, i checked it out...

AWESOME!...the subtle details look really nice...the cracks and such...is the raised sidewalk a seperate thicker piece of foam?

can't wait to see the grates installed...yer gonna have to make a sewer now you know?...lol

its amazing how easy you made this look
 

MAJOR BLOOD

Size matters
Staff member
Mar 13, 2011
13,592
8
38
Yea, he really did a great job on these. I'm tempted to go get some supplies for the lines and stuff. Very impressive, Rex. I still want to see a complete building eventually. Maybe you can do one for your dolls next.
 

G.I.*EDDIE

gobbles a LOT of cock
Founder
Mar 14, 2011
43,432
428
83
S.E. Mich :(
yeah, some sides with the stairs/loading dock is gonna be sweet to see...how bout a pic of the wall and sidewalk butted up next to each other
 

Mandingo Rex

★★★★★
Founder
Mar 14, 2011
14,392
7
38
42
Gone Baby, Gone
I was worried my hosting server might be acting up. It was being weird last night. Sorry about that loading lag.

Yeah, the split sidewalk has entire sections that I cut loose and glued back in place, but tilted to create the "popped-up" look. Other areas I just cut away to create cracks and whatnot.

Once I get the walls and whatnot finished from the styrene portion, I'm going to make 2 additional brick walls that just have windows so I can make an alleyway. Probably at least one more sidewalk section and an interior concrete or wood floor, too, so I can do proper shots. Once I have all that, I should be able to reconfigure them for quite a selection of cool shots. I just want to finish the street front first.

I'll try and get some shots of the wall and sidewalk together once the sidewalk is painted up.
 

Mandingo Rex

★★★★★
Founder
Mar 14, 2011
14,392
7
38
42
Gone Baby, Gone
what kinda glue did you use on this stuff?

Gorilla glue? It sounded better than wood glue at the time I was in the wood glue aisle at Home Depot. Not sure how well it holds up over time, I guess I'll see. SicDeth may have a much better suggestion on that.

Luckily, I haven't had to glue too much stuff together, but I had read somewhere to use wood glue, and Gorilla says on the tube that it bonds foam as one of its items, so I went with that.
 

Mandingo Rex

★★★★★
Founder
Mar 14, 2011
14,392
7
38
42
Gone Baby, Gone
Question:

What sort of doors do you guys think would be good?

For the large door, I can't decide if I want it to be a rolling style garage door, or something close to this.

For the 2 smaller doors, I was thinking something along the lines of an emergency exit style door (with the push bar) but the logic doesn't exactly make sense on why the push bar is outside (although I'm sure this happens from time to time). The other door would be something like this but with a horizontal slat near the top, not on the side.

I'm planning on putting a vent over the raised door like this and the windows will probably have grills on them with a few panes of glass broken. I may even have a window boarded up, too.

Thoughts?
 

Mandingo Rex

★★★★★
Founder
Mar 14, 2011
14,392
7
38
42
Gone Baby, Gone
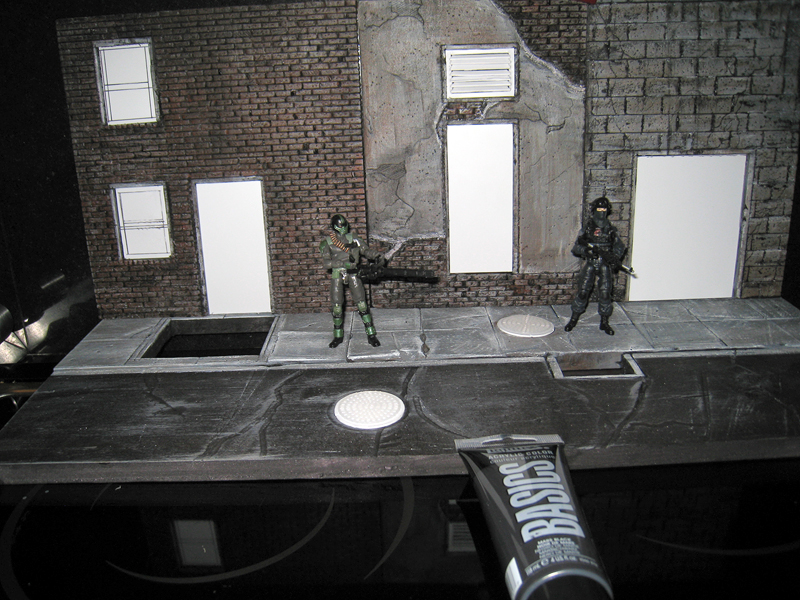
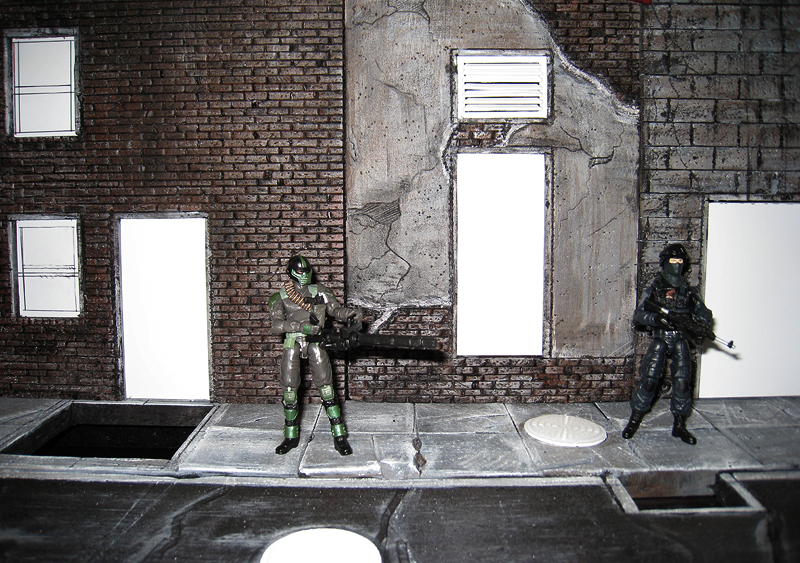
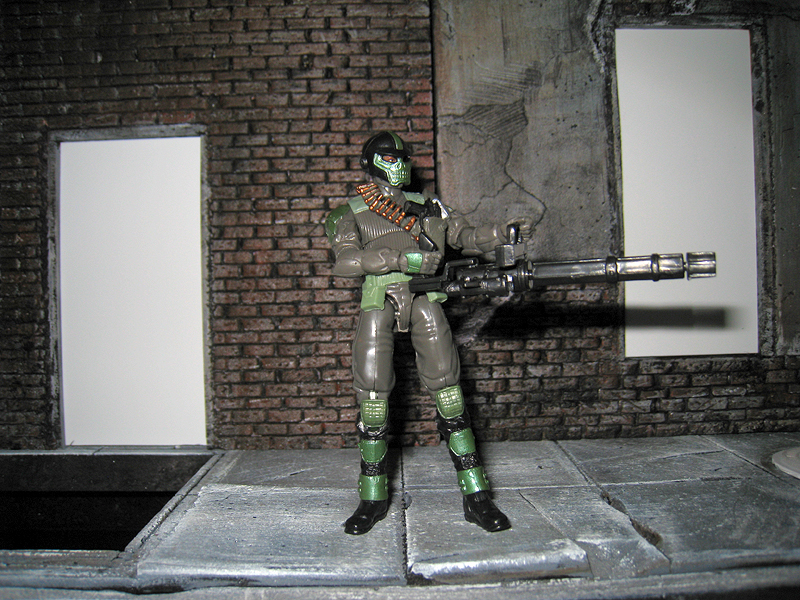
I painted up the sidewalks, although I think I am not quite done with that. I want to even out the concrete a bit more, and probably add another coat of black as a wash, or some stippling/detail work.

I didn't get the two sidewalk drains cut out, and although I cut out the basic shapes for the doors and windows, the only one I got to finish was the vent over the one door. The windows still need the window frames cut out and glass and grills cut for them, and the doors all need the detailing done. I haven't exactly decided what I want to do with the doors, either.

Below are some quick pics of where I am:


Any feedback would be appreciated, as I've got a good deal left to do still.
 

G.I.*EDDIE

gobbles a LOT of cock
Founder
Mar 14, 2011
43,432
428
83
S.E. Mich :(
Oh ho hoooo!...looking AWESOME!...the two grates are perfect!

...i'd leave the paint alone...the sidewalk looks good as is...ya don't want to make it too dark...maybe sporatically, but thats it...

the push bar style door i think is only exposed on roof doors?...as for the garage door, i'd go with the roller...if you take a piece of cardboard and peel one side off you'll have the rolled steel look, and it takes paint well...
 

Mandingo Rex

★★★★★
Founder
Mar 14, 2011
14,392
7
38
42
Gone Baby, Gone
Thanks man. I think you're right on the push style doors, they're only used in "emergency exit" locations where they need to push outwards. I still want to make one, but it'll probably be on an interior setting. I think putting a little chain around it would be awesome.

I don't plan on going much darker on the sidewalk, just in a few spots to give it that moldy look. I plan to add some green and maybe a little foliage too. Some tufts of grass or moss. I should probably add a few green highlights to the walls at some point.
 

MAJOR BLOOD

Size matters
Staff member
Mar 13, 2011
13,592
8
38
Maybe spray it down with a matte finish when you are done. This way if you do a scene and want to use blood or something it comes off easy and does not get in the pores.

Other than that you really nailed this. The sidewalk looks fine. If you go any darker it won't look too realistic. This is back of a POC card quality.

You just wanted to gloat with the Range viper didn't you? ;) How the hell is he going to hide in an urban environment?
 

Mandingo Rex

★★★★★
Founder
Mar 14, 2011
14,392
7
38
42
Gone Baby, Gone
That's probably the last step I'll take since I'll more than likely be futzing with this for a few weeks, but a good call to protect the final job. Any suggestion on clearcoats? I know once it's painted that sprays won't hit the foam, but I've steered clear of sprays for the most part since I live in an apartment and don't have a great spray area.

I think I'll add a gloss clear near the drains and pipes (if I add any pipes) to give some areas a wet look. Or will that photograph awfully?
 

MAJOR BLOOD

Size matters
Staff member
Mar 13, 2011
13,592
8
38
There has to be a clear coat at a craft store. I use spray ones from wal mart. There is a craft one and a stronger one. The craft one is good for diorama pieces and the other is good for vehicles. I'm sure Michael's has something though.
 

G.I.*EDDIE

gobbles a LOT of cock
Founder
Mar 14, 2011
43,432
428
83
S.E. Mich :(
i've got a good clear coat i got from michaels...it dries really fast...its an acrylic clear so i think it would be safe on the foam even if it wasnt painted...honestly, compared to the figures, i thought it was flat cleared already...

i'd definately add drain pipes near the bottom of the walls...that'd look cool...some water stains on the sidewalk with a small puddle under them would for sure be a neat effect...

the small details always make things look better...the moss/weeds/foliage would be killer especially if you can get it to look realistic...maybe a tiny piece of green thread unraveled would work as grass/weeds?

and the chain around an interior warehouse door would bem uh, cute? :D...man, doing an inside dio presents a whole new bunch of cool things to make...i know they make lots of tools/chests/hoists/engine stands etc for mechanics shops....you could do a garage type setting...maybe Dreadnoks?...Clutchs shop?
 
Last edited:

Mandingo Rex

★★★★★
Founder
Mar 14, 2011
14,392
7
38
42
Gone Baby, Gone
When you say "drain pipe", what do you mean exactly? Like ones that come out of the wall, or have a gutter pipe attached to them?

I was considering using crinkle straws, flattened square, as gutter downpiping. (Some actually funnel through the walls from the roof, others run on the outside in pipes, is what I mean.)

For the grass bits, I'm trying to swing by Michael's tonight. I think they actually have those little trees and moss-like greenery in bags that you can glue in place. I had also considered using that flexi-sculpy too and sculpting little bits that I could use for the cracks.

I dunno, it's a bit of experimenting I guess.
 

SR_501

Walfisch.
Mar 14, 2011
985
1
0
Damn, that looks great! May start during this for a WWII city display.... So much awesomeness on the forum right now! Just, so little time.